Sacha Barber recently posted an article to CodeProject titled “A Simple WPF Explorer Tree.” The article shows how to lazy-load the TreeView control with the directory structure on your machine. It is a nice gentle intro to lazy-loading the WPF TreeView, and I highly recommend checking it out.
After reading Sacha’s great article I felt that something was amiss. In his demo, the root level items in the tree have a “drive” icon, and all other items have a “folder” icon. The way he implemented the logic which determines which icon to use involves a value converter. A TreeViewItem’s Image element, which displays an icon, has its Source property bound to the Header of the TreeViewItem. That binding has a converter which looks for a backslash character in the header text, and if it finds one that means the item is at the root level (i.e. it represents a drive, not a directory). For example, if the value converter receives “C:\” as the header text, it returns the “drive” icon.
The value converter contains the names of the icon resources, and it actually loads a BitmapSource using those hard-coded resource identifiers. This is what I have a problem with. I think that hard-coding resource identifiers in things like value converters and template selectors should be avoided because it severely limits the reusability of those classes.
There are at least two other ways to go about implementing this icon selection functionality that do not involve sticking resource keys into a value converter. The first option is to allow you to set the icon file names (the resource identifiers) as properties of the value converter. That way you can specify which icons to use in XAML, and the converter is only required to know how to analyze the data it is passed.
I don’t like that option too much. I really don’t think that using a value converter is ideal in this situation. The converter is basing its logic off of the presence of a certain character in the header text, which works just fine, but feels brittle to me. I think that the structure of the TreeView and its items should provide all the information we need, not the arbitrary contents of the data in the items.
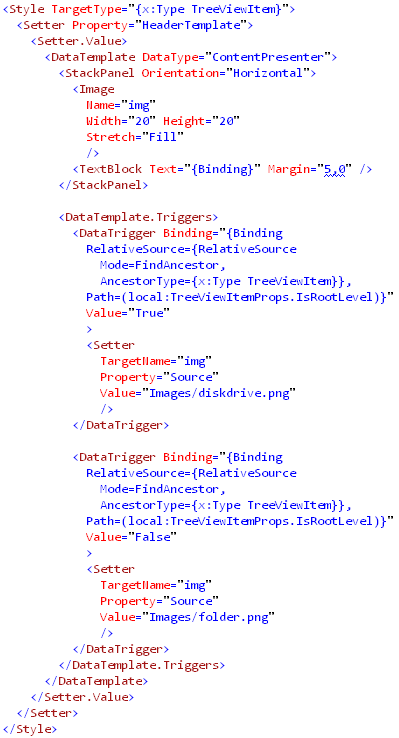
The solution I came up with involves applying an attached property to the root level items, and then using DataTriggers to bind against that property and decide which icon to use. Here’s the code. First we have the class with the attached property, note the default value is false:

(Sorry about the weird indentation there, my images can only be so wide…)
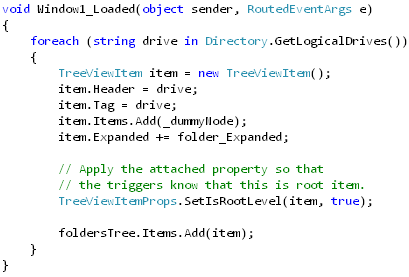
When we create the initial set of TreeViewItems, representing the drives on the computer, we set the IsRootLevel attached property on each item to true:

Finally, we have the template which specifies how each TreeViewItem should render its header. Notice that since the header is shown by a ContentPresenter, we need to bind the DataTriggers against a relative source which finds the associated TreeViewItem:

Download the demo project here: ExplorerTree (demo project) Be sure to change the file extension from .DOC to .ZIP and then decompress the file.


You could remove one of the datatriggers and just define a default on the Image tag directly.
I did try triggers, but couldnt get them to work, once again, I bow (really) to your WPF wisdom.
Great.
Thanks
Thanks Steve. Someone else had also pointed that out to me earlier today. I guess I should have spent more time cleaning up the solution before posting it and heading off to work!
Sacha, I’m glad to provide an alternate perspective on solving the problem.
Thanks,
Josh
always welcome chap
[…] In response to Sacha’s article Josh Smith made a few minor enhancements and posted his article Reaction to: A Simple WPF Explorer Tree. […]
Really fast. All it need now to be perfect is a drill down to start at a specific folder and it’s perfect. I wish I new enough about WPF to do it!!!
Hi Josh,
Just wanted to first thank you and Sacha for great article. This and your other posts have saved me and probably countless others a ton of time with getting up to speed on WPF.
I really got inspired with WPF and the TreeView that I tried my hand at a multi-threaded implementation that fetches in the background, but still provides good feedback to the user.
If you get a chance the article is at http://www.codeproject.com/KB/WPF/ThreadedWPFExplorer.aspx.
I’d love to hear your feedback.
Thanks,
Kavan
in your revision –
1. seems to me two triggers is (are?) overkill (also not the normal pattern for data triggers).
2. the image source really ought to be a static resource:
…. in the data template:
… one data template trigger needed:
I’m currently scaling the LC of WPF and reading code in blogs and other docs can lead to very sloppy non-performant coding practices when paradigms omit hidden subtleties.
Thanks Patrick. It’s always good to revisit an old demo and find why it sucks.
Josh
Patrick is a critic. Those who can’t do, preach.
No need for two triggers indeed, so it is OK to acknowledge it, Josh.
Thanks for the example guys.
Thanks for the great idea.
I solved it a bit differently – I just put the image itself as the attached property.
public static class TreeViewItemProps
{
#region TreeViewImageSource
///
/// TreeViewImageSource Attached Dependency Property
///
public static readonly DependencyProperty TreeViewImageSourceProperty =
DependencyProperty.RegisterAttached( “TreeViewImageSource”, typeof( ImageSource ), typeof( TreeViewItemProps ),
new FrameworkPropertyMetadata( (ImageSource)null ) );
///
/// Gets the TreeViewImageSource property. This dependency property
/// indicates source of a header image.
///
public static ImageSource GetTreeViewImageSource( DependencyObject d )
{
return (ImageSource)d.GetValue( TreeViewImageSourceProperty );
}
///
/// Sets the TreeViewImageSource property. This dependency property
/// indicates source of a header image.
///
public static void SetTreeViewImageSource( DependencyObject d, ImageSource value )
{
d.SetValue( TreeViewImageSourceProperty, value );
}
#endregion
And the template is a lot simpler:
Here’s the template:
I give up – i can’t post the template.
😀 You need to replace the angle brackets with their HTML encodings.