Yield to the power of yield

May 26, 2008

I must admit, I had never really become too comfortable with the C# ‘yield’ keyword until recently. I knew that it was introduced in C# 2.0 as a means of simplifying the creation of an enumerator. I also knew that the C# compiler interprets the code in a method that uses the yield keyword. A compiler-generated implementation of IEnumerator exists behind the scenes, which implements the logic to produce the enumerator you declared in C#. Beyond that vague understanding, I was not too familiar with it. It felt “odd” so I rarely used it.

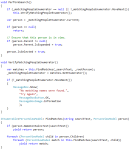
In my ‘Simplifying the WPF TreeView by Using the ViewModel Pattern‘ article I have a demo program that lets the user search through the items in a TreeView. The search logic uses the yield keyword, as seen below:

(Click on the image to view the source code at full-size)

The article also has a demo program that lazy-loads each item’s children. That demo does not provide the ability to search. Shortly after publishing the article, two people asked how to have a lazy-loaded tree with search capabilities. Aside from the fact that performing a search that produces no matching items will force all of the items to be loaded; it is a reasonable question. I decided to implement a solution.

At the time, I misunderstood exactly how my search method used the ‘yield’ keyword. I was under the false assumption that it was executing the search logic to completion when the FindMatches method is called, and storing the results in a collection of some type. As we will see later, this is entirely untrue, but I, too, can be an idiot sometimes. 🙂

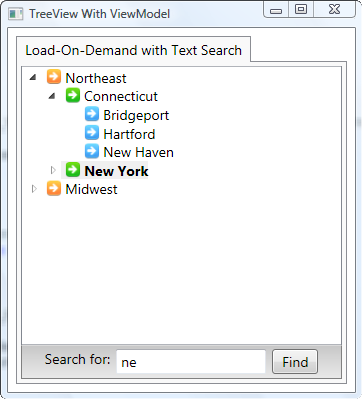
I took the load-on-demand sample and added in the ability to search the items. The UI looks like this:

Based on my misunderstanding of how a yield-based enumerator works, I thought it would have been bad to use it in this situation. Since I (incorrectly) thought that it walked down the entire data tree upon creation, performing a search with it would have forced the entire tree to be loaded into memory at once. So I thought that I had to create a custom search algorithm that would perform the search and only load as many items into memory as necessary to find the first matching item. After finding the first match, the next time I perform the search, it should only load as many items as necessary to find the next matching item. And so on, and so on…

I have plenty of experience building recursive algorithms that walk over trees, but I had never built one like this. Most recursive algorithms store their state on the callstack. Each time the recursive method is called, a new frame is pushed onto the callstack, and it keeps track of the local variable values for you. By ‘local variables’ I mean things like, the current item, the index of a for loop, the parent item to which we return after processing a sub-tree, etc.

That’s all well and good, until you need to create a recursive method that returns a value and, later on, needs to resume processing from where it left off last time it was invoked. This is exactly what I needed to build. I needed to create a recursive algorithm that stores its state in an external data structure, so that I can effectively save and load that state between executions. It was an exciting Sunday morning programming exercise, for sure!

The source code of the demo app is available at the bottom of this post. In it, you’ll find a TreeViewItemViewModelSearch.cs file. It contains all of the code involved with this implementation. That file contains a static class, TreeViewItemViewModelSearch, which contains just one public method:

The SearchResult class implements IEnumerable<TreeViewItemViewModel> and its GetEnumerator returns an instance of SearchEnumerator, which implements IEnumerator<TreeViewItemViewModel>. This search logic is invoked by the enumerator’s MoveNext method:

(Click on the image to view the source code at full size.)

The helper classes seen in that algorithm are listed below:

As it turns out, none of this is necessary at all! If you look in the TreeViewItemViewModel class, you will see how there are two implementations of the search functionality. One of them uses the very elaborate code we just saw, and the other, which works JUST AS WELL as my code, is a simple method with the ‘yield’ keyword. Click on the following image to see how both techniques are used:

As seen in the FindMatches_Yield method, all that I had to do was add in code that lazy-loads the child items before it searches them! The compiler-generated implementation of my search logic will be invoked every time the enumerator’s MoveNext is called, and it only searches for one item at a time. This is perfect for a load-on-demand scenario. If I had known about this earlier, I never would have bothered to write that custom search enumerator. But then again, it was a lot of fun and quite interesting to implement, so it’s all good!

Download the source code here: treeview_with_viewmodel_lazyload_and_search_demo Be sure to change the file extension from .DOC to .ZIP and then decompress the file.
The WPF TreeView is a View of a Tree

May 24, 2008

I have been thinking a lot about the WPF TreeView control lately.  My recent article about it, which, by the way, is my wedding gift to Sacha Barber, discusses how the ideal way of working with a TreeView is to bind it to a ViewModel, and then program against the ViewModel.  This got me thinking.

When I first started learning about Windows Forms, I thought the TreeView control had a strange name.  Why not call it the Tree control?  Why did they add the word “View” to the end?  At the time, the .NET 1.0 era, I don’t think any other control had the word “View” tacked onto the end of its name, except for ListView.  After a while, I got used to the name and never gave it much thought, until now.

The WinForms TreeView control is not really providing a “view” of a tree: it is the tree.  You create a tree data structure in the control, where each node in the tree is of type TreeNode, and the control renders those nodes.  One could argue that the WinForms TreeView control’s name is a misnomer, because it can only show its own TreeNodes.  By the same reasoning, we should call the Menu a MenuView and the ComboBox a ComboBoxView, but that is not the case.  WinForms should have a Tree control instead of a TreeView control.

The WPF TreeView control is very different.  Granted, at the end of the day, it still has a tree data structure consisting of TreeViewItem objects, but the similarities end there.  We can use the TreeView in our WPF programs to literally provide a view of a tree.  The fact that the WPF TreeView supports data binding allows us to create a tree data structure, perhaps of custom ViewModel objects, and provide it to the TreeView control’s ItemsSource property.  At that point, the TreeView will do all the grunt work of creating TreeViewItems and hooking them together for us.  We are not required to focus much on the TreeView, but more on the data we actually care about.

We can provide in-depth customizations for how the TreeView renders the items, by setting properties such as ItemContainerStyle to affect properties of every TreeViewItem, and ItemTemplate to specify what each item should look like and where its child items come from.  We declare all of this in XAML, and let TreeView handle all the details of applying our styles and templates. We can remain focused on the tree data structure, it’s behavior, it’s state, and just tell the TreeView how we want to view the tree.

It might seem like a minor difference, but, in my opinion, it represents a significant change of mindset.  In WPF, the TreeView control provides a view of a tree.


Article about using a ViewModel with the WPF TreeView

May 22, 2008

In a surge of Mahler-inspired geekery, I wrote and published what I consider to be one of my best WPF articles. If you have ever thought that the WPF TreeView is too complicated and doing anything non-trivial with it is difficult, think again! Over the past few days I have been solidifying my TreeView programming techniques, thanks to an invigorating e-mail thread with Sacha Barber, and it all culminated in this article:

http://www.codeproject.com/KB/WPF/TreeViewWithViewModel.aspx

My favorite paragraph from the article:

WPF is great because it practically requires you to separate an application’s data from the UI. All of the problems listed in the previous section derive from trying to go against the grain and treat the UI as a backing store. Once you stop treating the TreeView as a place to put data, and start treating it as a place to show data, everything starts working smoothly. This is where the idea of a ViewModel comes into play.

Enjoy!


Brennon Williams Sweetens the Pot

May 21, 2008

The Podder Skinning Competition is at full speed now! The first place winner now stands to also win a copy of the new book Microsoft Expression Blend Unleashed, courtesy of Brennon Williams. Brennon is the author of that book, and also the newest WPF Disciple. Thanks a lot, Brennon!


Updated Panel3D code and demos now available

May 20, 2008

I fixed Panel3D so that its child elements can be transparent.  The updated source code and demo applications are now available for download from the CodeProject article:

http://www.codeproject.com/KB/WPF/panel3d.aspx


Gradual Introduction to WPF Data Binding

May 19, 2008

In my opinion, one of the biggest differences between programming in WinForms and WPF is how much you use data binding.  WPF programs typically make heavy use of data binding, but many WinForms apps do not use it nearly as much.

I just published an article on CodeProject that is intended to help people with WinForms and ASP.NET backgrounds to start thinking in terms of WPF data binding.  It walks you through four iterations of the same simple app: going from all code with no data binding to all XAML with data binding.

If you want to check it out, here’s the URL:

http://www.codeproject.com/KB/WPF/MovingTowardWpfBinding.aspx

Enjoy!


Charlotte Code Camp 2008 was great

May 19, 2008

On Saturday Karl Shifflett and I gave an all-day “WPF for Line-Of-Business Applications” track at the Charlotte code camp. We had a very good turn out, and a lot of fun. The number of people in the sessions who are already using WPF in their business’s applications is much higher than last year. WPF is starting to gain traction in the “real world.”

We attempted to record the sessions, but ran into some technical difficulties that we didn’t have time to troubleshoot and fix. Next time we give the presentation, we will try to record it again.

Here are my presentation materials. Sorry, but I cannot include the demo project for the second session (don’t ask why, it’s complicated…): My Presentation Materials

When you download the file, change the extension from .DOC to .ZIP and then decompress it.

Also, thanks to Infragistics for flying me down to North Carolina and supplying so many great hand-outs for the attendees. Thanks to Microsoft for buying so many awesome meals!! Also, thanks to Karl for organizing the WPF for LOB track, and the amazingly fun night out on the town afterwards. Saturday night was an AWESOME experience for everyone! 😀


WPF for LOB track at Charlotte Code Camp

May 16, 2008

On Saturday May 17th, 2008 (i.e. tomorrow) Karl Shifflett and I will be giving an all-day presentation about using WPF to create line-of-business (LOB) applications. So if you are anywhere near Charlotte, North Carolina, and want to learn about WPF for LOB, stop on by! It’s free to register and attend.

You can read more about it here. Karl has posted his excellent demo application, which will be the focal point of his three sessions here. I will post my presentation material directly after it finishes, since some of my material will be created during the sessions.


Mobiform Sweetens the Pot

May 13, 2008

The Podder Skinning Competition has officially reached a new level of cool.  Mobiform has generously contributed a licensed copy of their Aurora for Architects design application, which I am going to give to the first place winner.  Thanks a lot, Mobiform!  8)

You have until July 1, 2008 to submit a Podder skin.  The list of prizes is really amazing at this point!  You can learn all about the competition here.   If you want to get started making your own Podder skin, check out this page.


Panel3D now supports transparency

May 10, 2008

Not too long ago I created a WPF panel that lays out its child elements in 3D space, called Panel3D. When playing around with it, I never could figure out a way to make the 3D models in the panel support transparency, such that you could see models lower in the z-order “through” models higher in the z-order. The models higher in the z-order (i.e. those appearing closer to the viewer) were always opaque, thus covering up models behind them.

Someone left a comment on that article, asking how to create semi-transparent items in Panel3D. I didn’t know the answer, but luckily someone else did. It turns out that I was adding the 3D models to the Viewport3D’s Children collection in the wrong order. Panel3D was putting the front-most model at the beginning of the Children collection (technically, the scene’s light source is the very first child). The index of a model in the Children collection matched its visible index, meaning that the element furthest away from the viewer was the last child in the Viewport3D. This was completely wrong!

It turns out that transparency of 3D models in a Viewport3D is a little more tricky than working with transparency of 2D elements living in a 2D world. For transparency to work correctly in a Viewport3D, you must add the models into the Children collection in the opposite order than which we see them (relative to the scene’s camera). If you want to learn more about this issue, go to this blog post, which explains the issue quite well. Unfortunately, the utility method offered in that post does not work in Panel3D.

I modified Panel3D so that it arranges the models in the correct order. The updated source code is not yet available, since I want to give it some time to marinate in my head before I revise the CodeProject article. I did, however, update the WPF Disciples Blog Viewer 3D (with audio) application so that it takes advantage of this new feature.

Download the app here: WPF Disciples Blog Viewer 3D (with audio!)

NOTE: Be sure to change the file extension from .DOC to .ZIP and then decompress it.

Here is a “before” picture, of what the app used to look like (click to view full size image):

Here is the “after” picture, showing how the transparency looks:

I also added two new dependency properties to Panel3D.

AllowTransparency must be set to true if you want the models to be “truly” transparent. If you leave it to false, the old behavior is honored, where the items become more “dim” when their opacity is lowered. The new WPF Disciples Blog Viewer 3D app, seen above, sets this to true, which is why you can see through the items.

AutoAdjustOpacity can be set to false if you do not want Panel3D to automatically set the opacity of each element displayed in the scene. The new WPF Disciples Blog Viewer 3D app, seen above, sets this to false, which is why the items do not seem to fade away as they move into the distance.

I will release the new source code and update the CodeProject article soon…I promise! 😀